
Abbott Analytical Products
This web page contains working assumptions and detail discussion concerning software preparations. Unfortunately, due to the
complexity of the page was split into an Arduino programming section and an Android programming section. Both sections
have a details dicsussion of the programming involved as well as a collection of helpful images with comments. The Arduino section
also has section endnotes detailing changes required to accommodate substitution of the Uno Arduino board.
Working Assumptions
At this point in the project we assume
1> That the user already has the squirrel-chaser vehicle hardware assembled with a USB connection to a PC (Ubuntu, Windows, Mac).
2> That the user has sufficient skill to search the Internet and download content.
Software Preparations
Squirrel-Chaser Vehicle Platform Software Aspect of Project
Arduino Programming IDE
There are at least two software approaches for this project. Both approaches use programs called IDE(integrated development environment). In the author's opinion there is the hard-way "Arduino IDE" and the not-so-hard-way "Sloeber: Arduino-Eclipse-Plugin". Below are two sets of links for obtaining the Arduino IDE and and one for the Sloeber IDE.
Suggested Integrated Development Environment (IDE):
--- Standard (Not Recommended by Author) ---
Basic Arduino IDE {Select Operating System}: https://www.arduino.cc/en/main/OldSoftwareReleases
Arduino Web Getting Started With Arduino: https://create.arduino.cc/projecthub/Arduino_Genu...
--- OR (Recommended) ---
Sloeber {Install Stable by Operating System}: http://eclipse.baeyens.it/installAdvice.shtml.
Sloeber Quick Start: https://eclipse.baeyens.it/how_to.shtml
Skill Necessary to Continue:
The Big Software Assumption is that the user can locate, download, install, and use the selected IDE. The user should practice a bit with the selected IDE by creating throw-away projects until the user is comfortable with the IDE. A user should not move forward with this project until the user has progressed pass the on-board LED blink stage. {See https://create.arduino.cc/projecthub/rafu/internal-led-blink-c7ec4b for a basic blinking on-board LED skill demonstration.}
Once that point has been reached the likelihood of successfully completing the project increase greatly.
On a Global Project Level
The user should now perform the tasks listed below. The details for performing these tasks are provided in the remainded of this page.
Create a new Project (also called a Arduino sketch project container within the
selected IDE.
Acquire, install, include/add the libraries as identified further below to the
IDE and project as described further below.
Acquire the code bundle, a038_squirrel-chaser-master.zip
(*.java, *.aix, *.aia, *.apk, *.ino) and add those entities to the project as described further below.
Common Software Entities for Either Approach:
Both approaches rely upon a collection of libraries, source files, and critical USB-Arduino board setup values. The source files are commonly called header files and sketch files.
Libraries Common to Both Approaches:
A collection of libraries is required to execute this project. The each required libraries (or suitable substitutes) must be must be available from within the selected IDE before the project will successfully execute.
Next install the Required Libraries as library components from the zip file or download them from the Internet. The user will need to create an appropriate new Project or Arduino sketch project container. The user will then need to create the linkage between the required libraries suitable for the users environment.
A list of required libraries and links to their suggested download sources is given further below. The exact sequence of actions required to install is the same for both IDE-s. These required libraries need to be placed in the ..../Arduino/libraries folder. That folder location will vary from user to user depending the installation of Arduino employed by the user. But the typical locations are provided further below along with a tutorial from SparkFun regarding installation for Windows and Mac environments. Finally the the further assistance for including the required libraries in the project is also given further below.
|
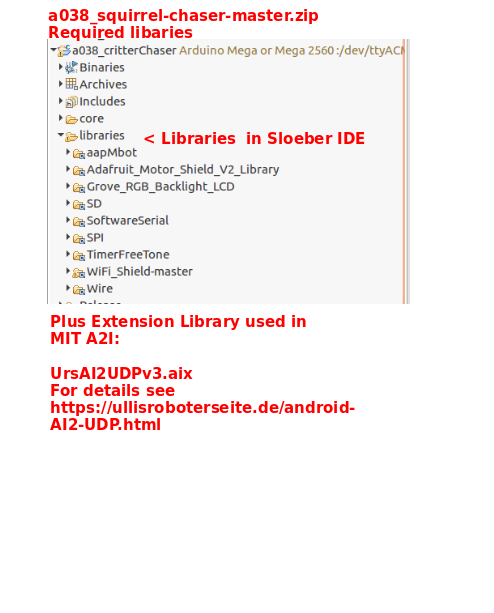
List of Required Libraries and Suggested Download Sources:
Libraries for use in Sloeber IDE
Adafruit_Motor_Shield_V2_Library
Seed Studio WIFI Shield:
Grove_LCD_Backlight:
SoftwareSerial
Note this library is called NewSoftwareSerial but
loads as #include SoftwareSerial
TimeFreeTone_V1.5.zip Arduino library
Wire
Wire library is bundled with Arduino
AVR Boards.
aapMbot
Extension Library for use in MIT App2Inventor IDE discussed later on this page.
AI2 UDP Extension: Connections are mostly overvalued …: (translates to English/German
Typical Arduino Library Folder Location:
- Windows: Users\username\Documents\Arduino\libraries
- OSX Mac: /Users//Documents/Arduino/libraries/
- Ubuntu: /home/username/Arduino/libraries
Helpful How-to for Installing Libraries:
Making the Libraries Available to Our Project:
Just when you think it is safe to go into the water, there is another step needed to make the libraries available to the project (formally called a034_nc_chickadee). For the Arduino IDE the task is call "including". For the Sloeber IDE the task is call "adding".
Including Libraries Arduino IDE
Adding libraries to Sloeber projects.
Source Files Common to Both Approaches:
|
The source files are commonly called header files and sketch files. The source files associated with the Abbottanp squirrel-chaser vehicle Platform project can be downloaded from the GITHUB:
https://github.com/trooker/a038_squirrel-chaser. The source files will arrive as a zip package a038_squirrel-chaser-master.zip. Once the content of this bundle has been extracted they can be directly file copied into the project folder. Then the project needs to be refreshed or restarted depending upon the IDE selected to have sources file reflected in the project.
|
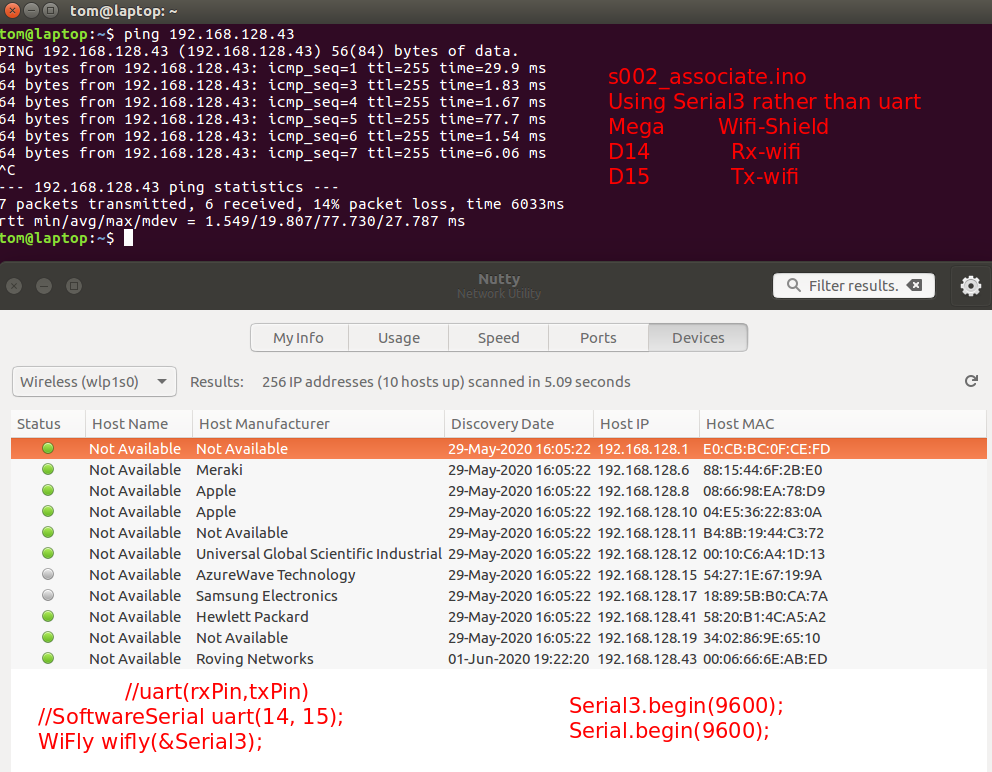
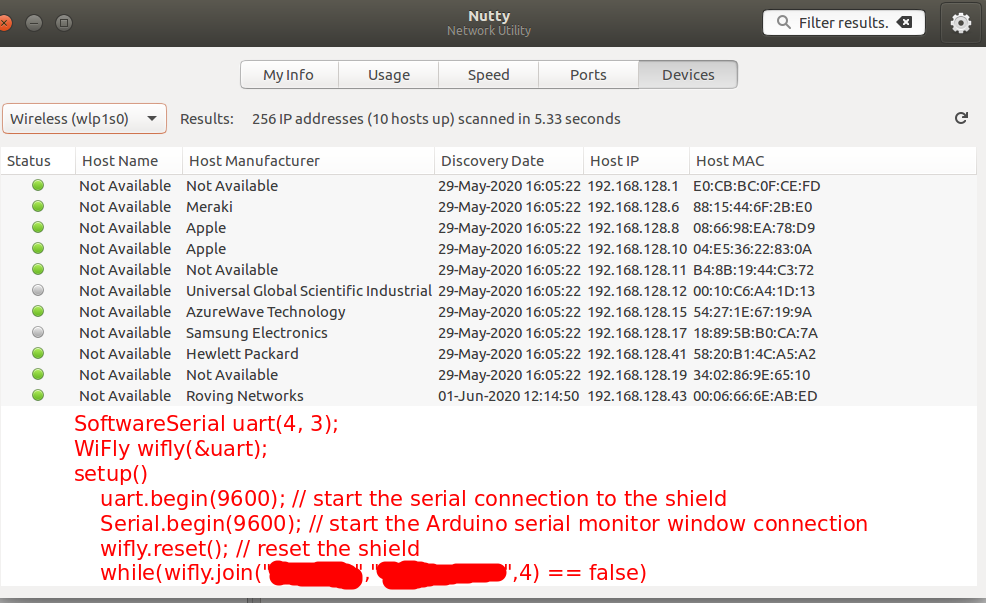
Registering Critical Values Common to Approaches:
Both approaches also demand that a specific set of values be registered with the IDE of choice, Arduino IDE or Sloeber IDE. That set of values insures proper USB connectivity to user's Arduino board.
Baud Rate of the Connection (typically 9600)
Arduino board type (Mega256 or Uno)
Helpful Images
| Link
| Comment
|
|
WIP
|
This table was largely derived from the a031_speed_gun_004 project. The viewer should see multiple references to that entity. Each of those references has a similar reference in the a034_nc_chickadee project.
|
|
Fresh Sloeber workbench
|
A newly created Sloeber IDE workspace awaiting the user's inputs.
|
Create New Project
|
Image displays annotation for creating a new project/sketch.
|
|
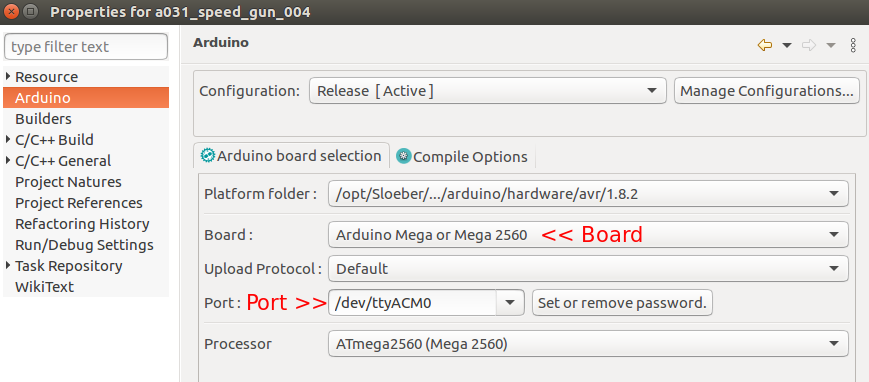
Board type and port Sloeber IDE
|
Both the Sloeber IDE and Arduino IDE require that the board type and USB port be defined in the project properties.
|
|
Board type Arduino IDE
|
Arduino IDE board type definition.
|
|
Port specification Arduino IDE
|
Arduino IDE USB port definition.
|
|
Adding Software Components
|
The project software components copied from the project code bundle.
|
|
Detail: Create project resource files
|
Create a container for the new project resource file.
|
|
Detail: Rename file
|
Provide the proper *.ino or *.h file name for the project component.
|
|
Required Libraries
|
Libraries necessary to compile the project as shown from the Sloeber IDE. These must be loaded to the project after downloading.
|
For Sloeber IDE
Adding libraries
First two
Last three
For Arduino IDE
Including libraries
Set Libraries to select
|
Download and install library to system Arduino folder.
Then "add" for the Sloeber IDE project.
-OR-
Then "include" for the Arduino IDE project.
|
|
Project Components Loaded to Sloeber
|
Various software components loaded to the project and ready for verification/uploading. Observe that the a034_venti.ino file content is displayed with the comment section compressed and early definitions displayed.
|
|
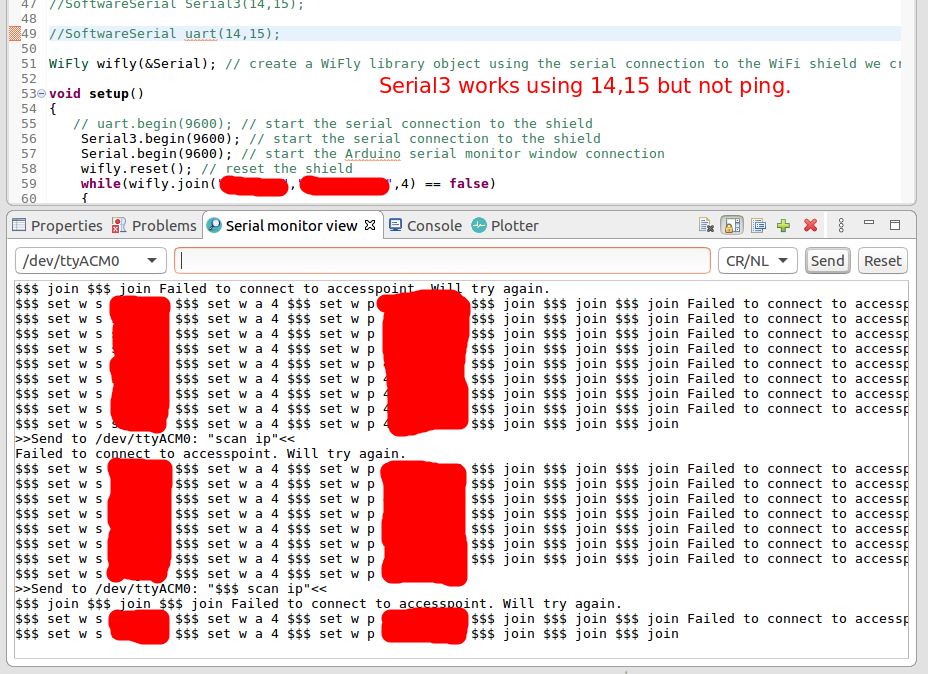
Open Serial Communication Sloeber IDE
|
Prior to uploading the program to the Arduino board, solid USB communication must be established between the IDE and the board. For Sloeber this is done by adding a new connection while in the "Serial monitor view" tabsheet.
|
|
Open Serial Communication Ardurino IDE
|
To start the Serial Monitor select it from the Tools menu.
|
|
Common buttons
|
Both IDE's have a verify and an upload button.
|
|
Successful verify operation
|
A successful verify results in a notification that the build finished with zero errors.
|
|
Upload program to Arduino board
|
Given that the USB connection has been setup, a proper upload should result in a message that the avrdude is done.
|
|
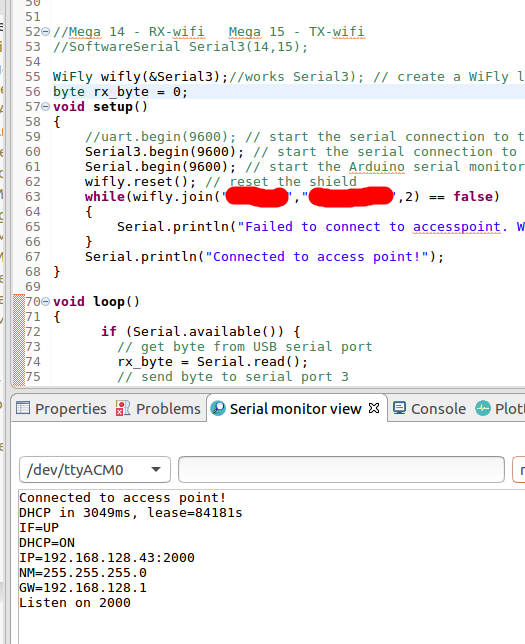
Upload begins a cycle
|
If the upload is successful and the "serial monitor view" is active then that tab should reflect message similar as shown. It it fails the message will not show
|
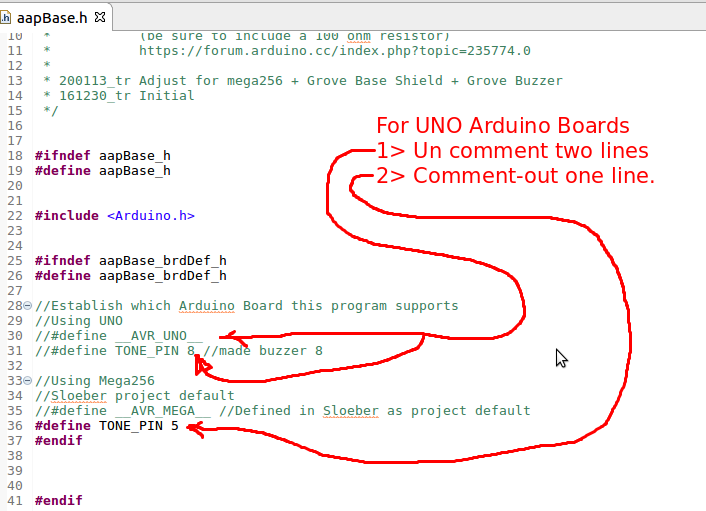
| 1> Substituing Uno Arduino Board |
|
The default Arduino board type for this project is Mega256. If the Arduino Uno board type is used two changes will be required. First the aapMbot.aapBase.h will need to have the Arduino board type change in this header file. The second place will be in the Arduino IDE or the Sloeber IDE. Both the Arduino IDE and Sloeber IDE require this change in the project specification phase.
|
| Link
| Comment
|
|
For Uno Arduino boards
|
Shows the two significant changes that must be made to the aapBase.h header file. Then the default board type must be changed for the project within the IDE from mega256 to Uno.
|
Android Programming IDE
For purposes of this project it is recommended that the user employ the MIT App2Inventor IDE, A2I. This is an OpenSource
tool which reduces substantial overhead and skill Android programming skill requirements from the user. This project employed the
on-line version as presented by the MIT team.
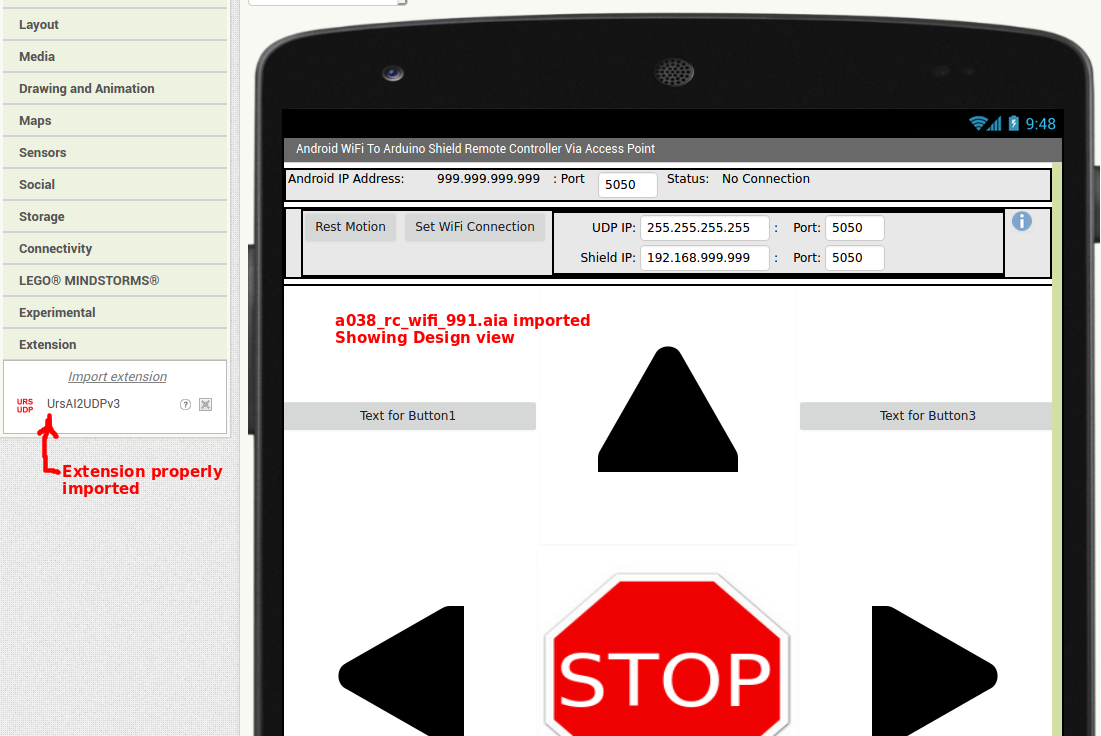
Using the on-line A2I the sketch block program a038_rc_wifi_991.aia and the extension UrsAI2UDPv3.aix it should be possiblibe
to re-generate the a038_rc_wifi_991.apk. Once installed on an Android and with an operational Arduino
Mega 256 squirrel-chaser running the a038_critterChaser.ino appropriate squirrel-chaser behavior should be observed. Initial
testing of the first generation squirrel-chaser produced a static run video videoand
an active motion test video.
If the previously mentioned extension library has not yet occrred, do so now.
Extension Library for use in MIT App2Inventor IDE.
AI2 UDP Extension: Connections are mostly overvalued …: (translates to English/German
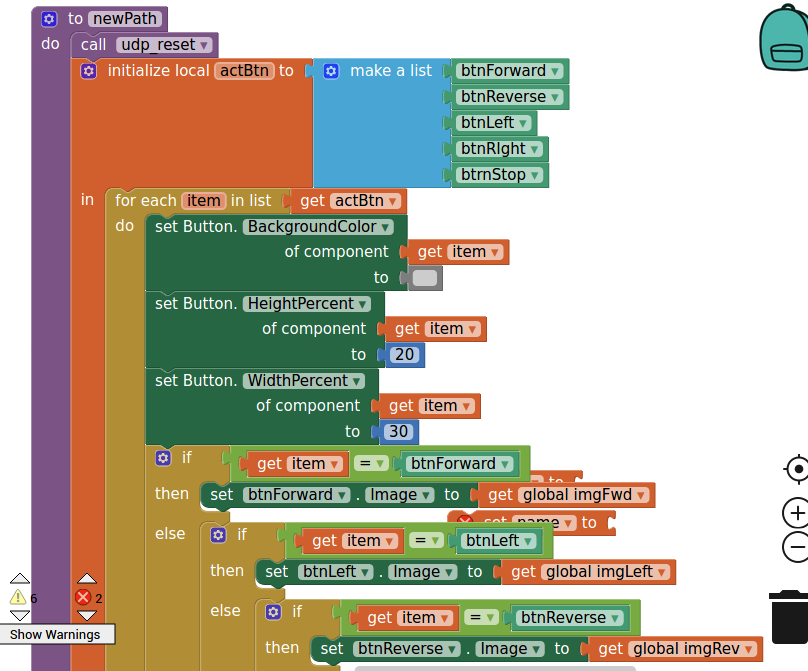
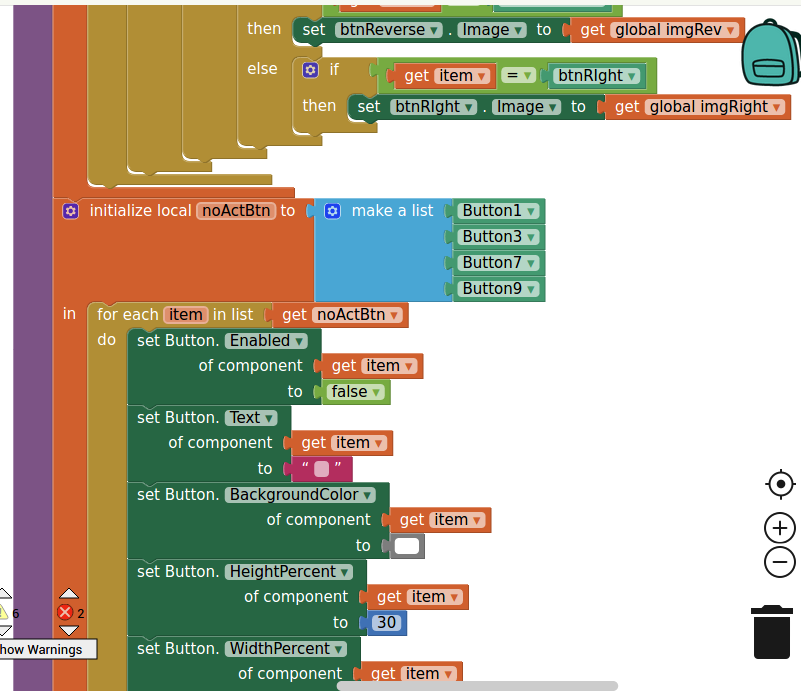
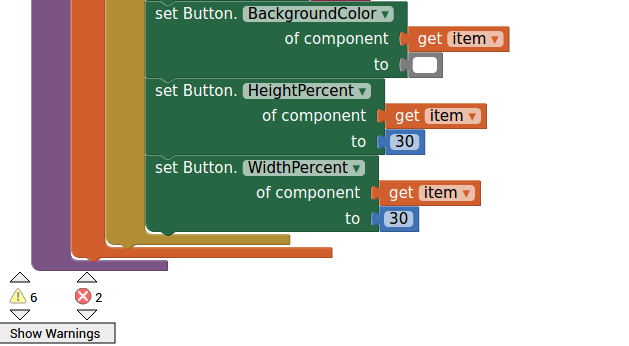
High Level Process Steps
- Start a session of MIT App2Invnetor.
- Start a new project.
- Import a038_rc_wifi_991.aia.
- Import the Extension: UrsAI2UDPv3.aix
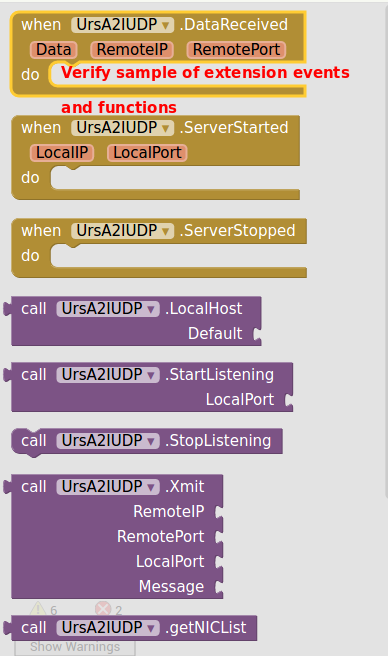
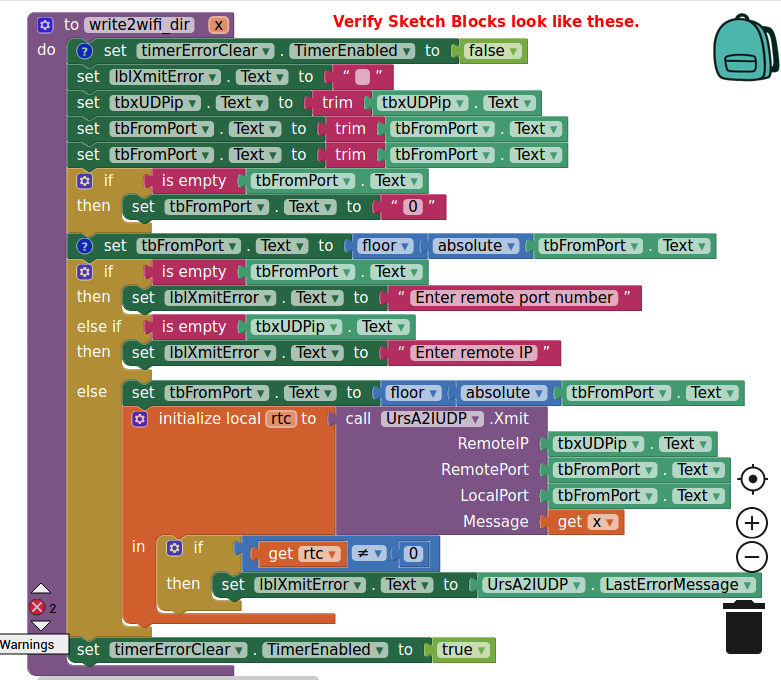
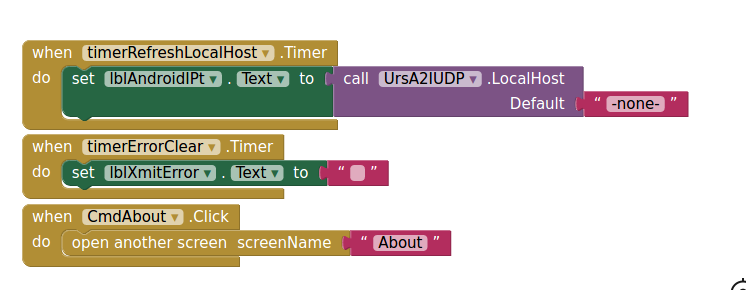
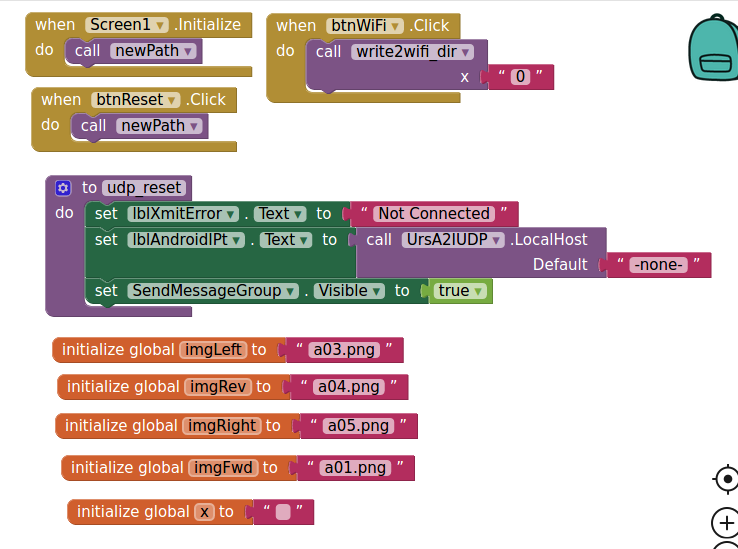
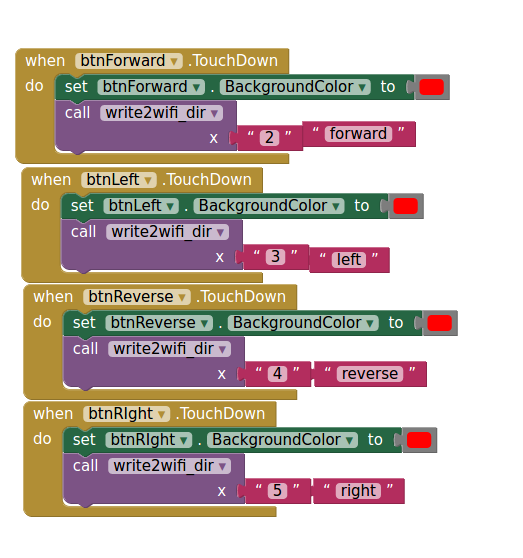
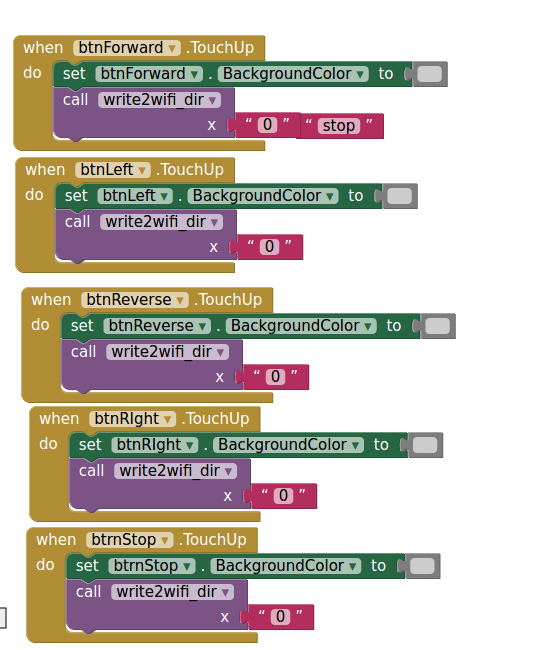
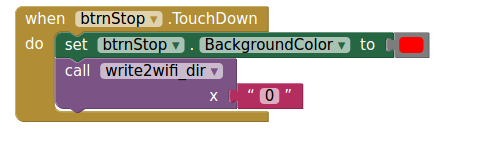
- Verify the Block rendering of the a038_rc_wifi_991 program looks like that depicted in the table of images:
| Image
| Image
| Image
| Image
|
|
|

|
|
|
|
|
|
|
|
|
|
|
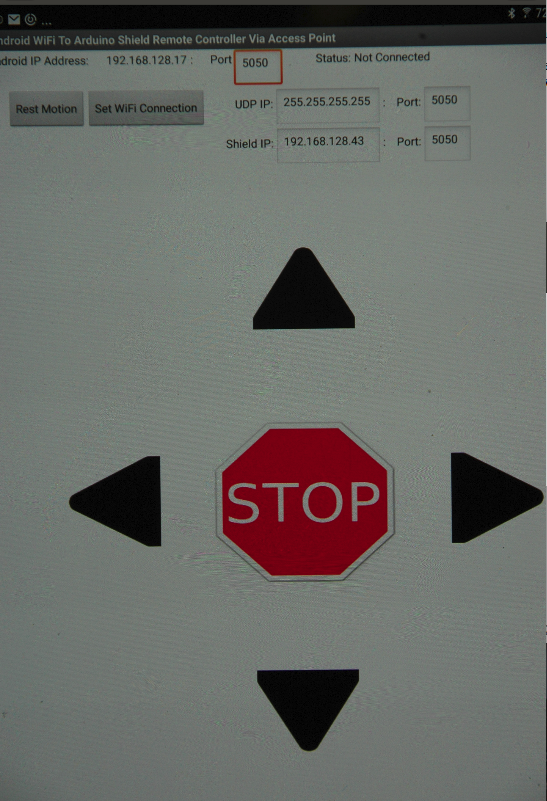
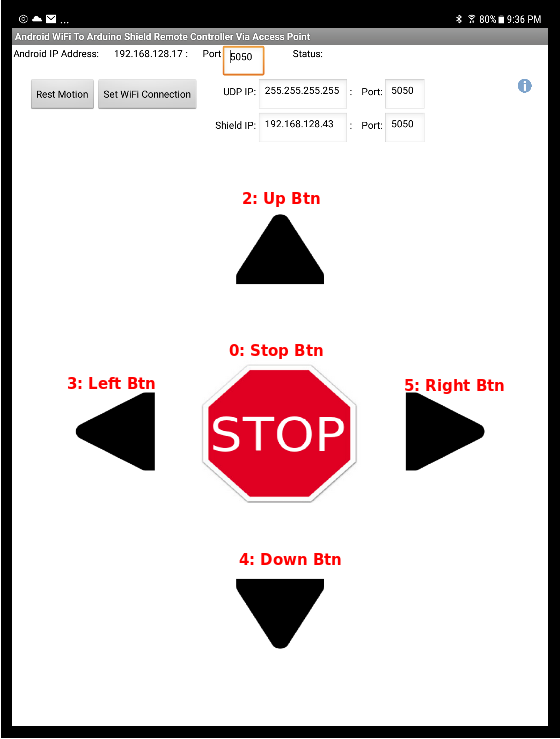
APK installed
Android >>
Tablet
|

|
|
- Build the a038_rc_wifi_991.apk and download to a local PC.
- Copy and install the a038_rc_wifi_991.apk on an Android
- Insure the WIFI Access Point is active.
- Employ a USB monitor program such as GTK-Term or run Sloeber/Android USB monitor
- With the Arduino Mega256 OFF, connect the USB to the Mega Board to the PCB
- Power-up the Arduino Mega256 squirrel-chase vehicle.
- Invoke the Android a038_rc_wifi app.
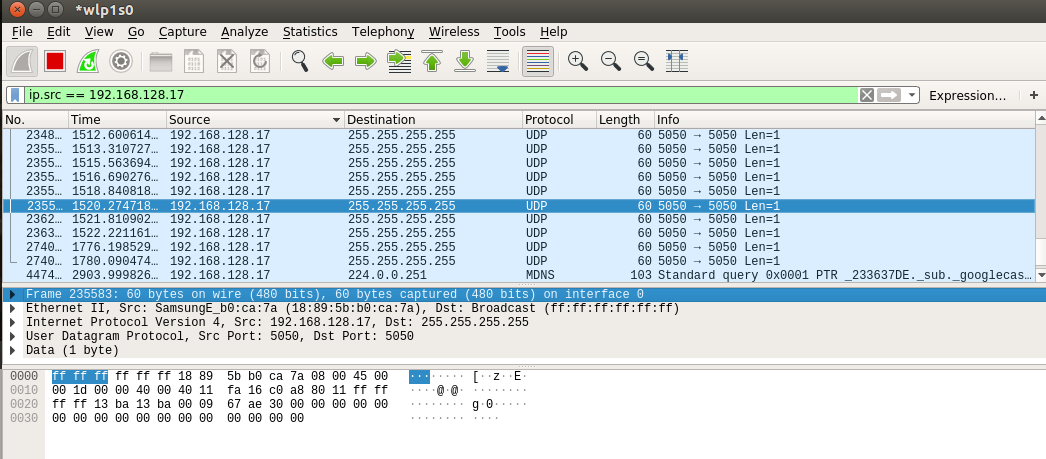
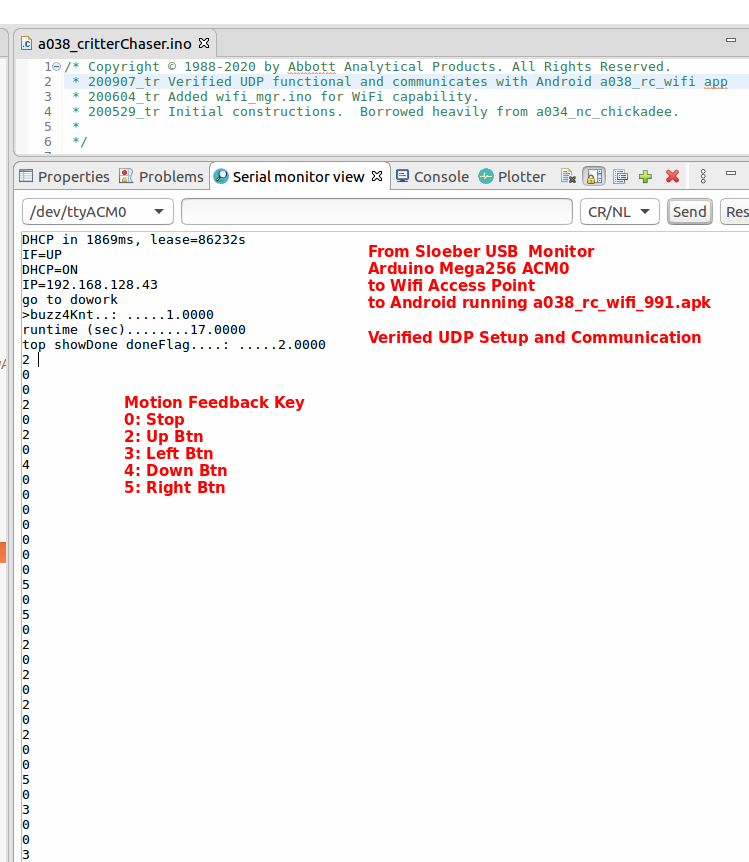
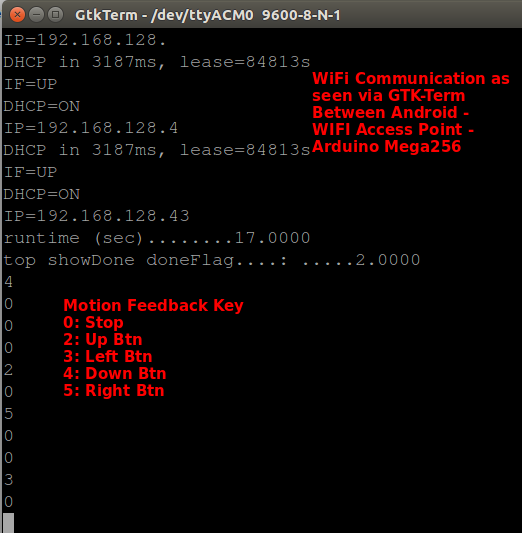
- Verify UDP connection and test.
| Image
| Image
| Image
| Image
|
|
|
|
|
|
|
|
|
|
|
Press Btn >
Android-
WIFI AP-
Mega256
< Motion
|
|
NOTICE: This site was fabricated for best viewing using
Netscape 4.x, or a functionally
equivalent browser.
Please send comments or questions using e-mail, voice telephone at 919-846-7705.
(Last update: September 8, 2020 tar)